Adobe Premiere Pro – Learn Interface
Understanding the composition of the default interface of the Premiere Pro and how to use each interface
Premiere Pro is an editor that is often used in video editing practices with final cuts and Da Vinci Resolve. Before working with a full -fledged Premiere Pro, let’s take a quick look at the start interface.
Premiere Pro panel
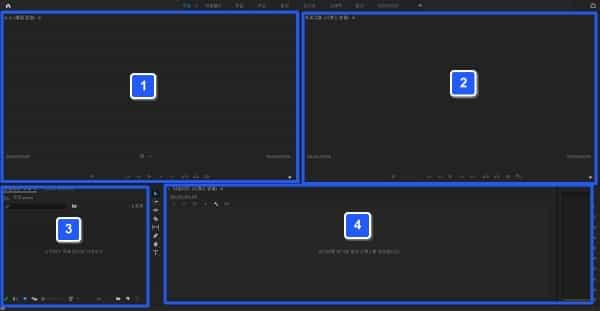
Start the Premiere Pro and is the basic panel screen. In the image above, you can set the panels for each number.

1. Source monitor panel
It is a panel that allows you to check the effects directly applied to the video. Here you can check and apply most of the Premiere Pro video work.
2. Program monitor panel
This is a panel where you can see the preview of the applied screen. Along with the video output, it is mainly responsible for the location of the subtitles and the additional function of the source panel.
3. Project panel
It is a panel that can load edited videos. You can apply multiple effects.
4. Timeline
It is a space where editing is made. You can edit it with a cut or file.
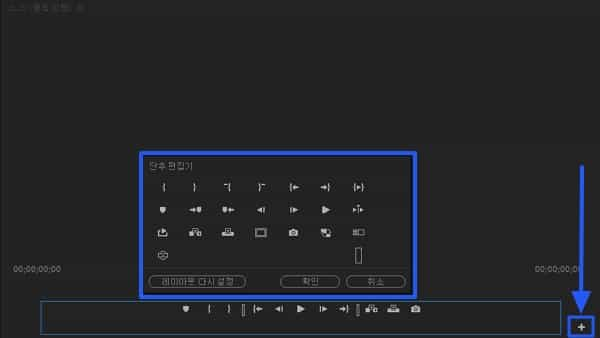
Shortcut icon editor

Press the right + button for each panel to edit the button icon of the panel. If you don’t like the icon of the default Premiere Pro, you can change it to the desired icon using the button icon editor.
Tool panel

1. Tool panel
It is a panel that has the functions necessary for editing through a simple shortcut icon. Add additional icons to add additional settings.
2. Audio panel
A panel that can check the settings related to audio (audio size). You can check the level similar to the actual audio size.
Summary
- The interface makes it easy to use the overall effect of the video.
- After editing the video, you can check the work results in the monitor panel.