Learn Adobe Photoshop interface default settings
How to customize the interface needed while working in Photoshop
Photoshop representative interface
Last time, we learned how to set up the work area in the Photoshop interface. Setting up the work area is the most important part of using Photoshop, so it was the first part of the interface explanation. In this episode, we will learn about the parts that perform additional functions in the Photoshop interface.
1. Tool area
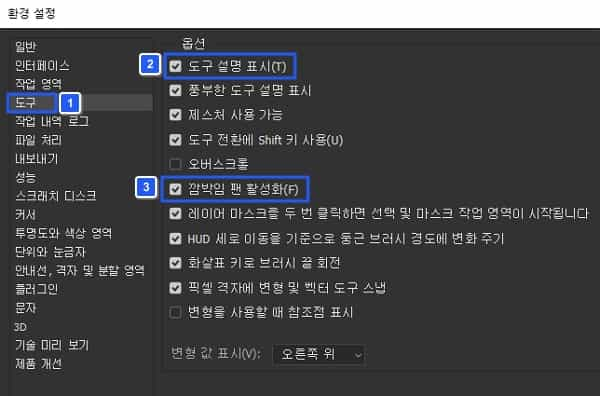
The first interface we will look at is the tools area. Tools refer to various functions used in Photoshop, such as drawing, erasing, and area selection, and the word tool is attached to various parts such as drawing tools and cutting tools.
- Show tooltips: Since this is a tool with such content, it is best to leave most of the Show tooltips checked. This is because you can check a brief description of a specific tool before using it.
- Activate Blink Pan: Blink Pan is a tool that can help you control shaking while working in Photoshop. In most cases, if you are using Photoshop for the first time, it is recommended to turn on Blinking Pan Enabled for more accurate work.
2. File processing
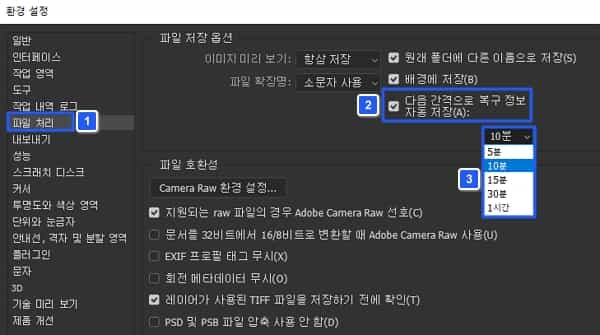
Photoshop file processing is used to set automatic save settings for images you have worked on or images in progress, or to change the contents of raw files in file compatibility. If you are using Photoshop for the first time, you can leave aside information about file compatibility and just check the auto-save option in the file save options. You can set the seed saving interval according to your desired time.
3. Export
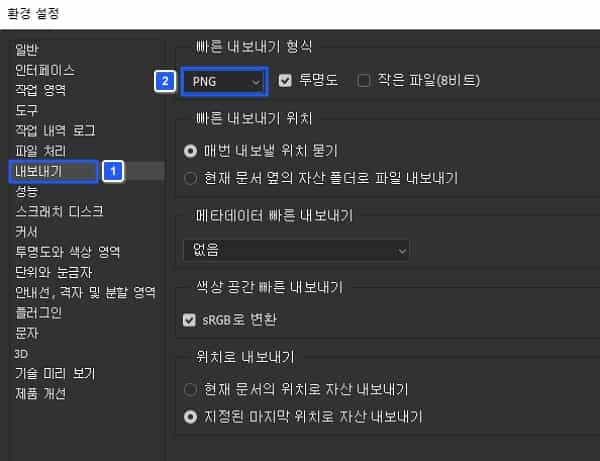
Photoshop interface export settings are required when exporting the image the user has worked on in a file format. All you need to do is set the default format for the file you have already worked on.
- PNG: The file size is larger, but the overall image appears clearly. Images may become corrupted during optimization.
- JPG: The file size is reasonable, but the image may become slightly blurred when optimizing it.
4. Performance
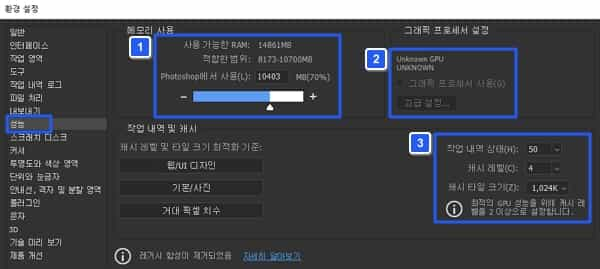
The performance section is a setting that varies the degree of work depending on the performance of the device using Photoshop, such as a PC or tablet. When using memory, the more memory you use, the faster you can export or execute tasks.
Likewise, the graphics processor may also vary depending on the user’s device environment. Everything depends on the user’s settings. If you want something fast even if it consumes a lot of memory, you can set the memory usage above the average value.
Lastly, the history status indicates how often Photoshop creates cache files. Since the cache type size can be changed at any time, we recommend that you try it out and then set it again.
5. Units and rulers
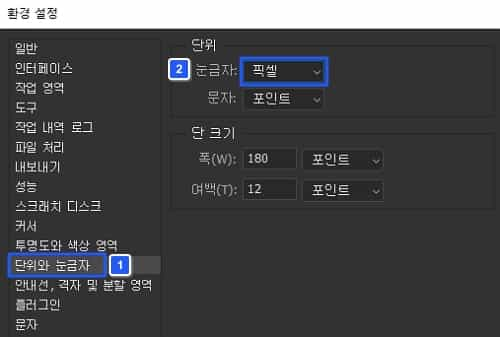
This is something you will often see while using Photoshop. Setting the ruler in pixels (px units) is easiest to see and can be used for general purposes.
6. Character settings
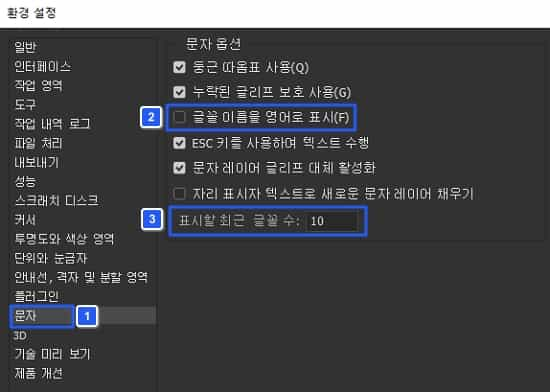
Font names can be displayed in English or Korean. You can also limit the number of recent fonts to create a clean interface. You can edit and set various text-related issues in Photoshop.
Summary
- The working environment may vary depending on the Photoshop tool area settings.
- In Photoshop’s additional interface, you can set up export settings for completed files.